Installing the James Duff 2.5 Suspension Lift
By: Mat Riddle
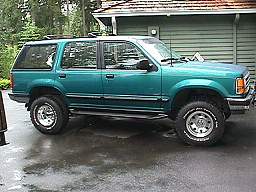
I installed this lift on my 1992 4 dr Explorer XLT. I had already been
running 32 inch BFGs with my 2 Body Lift, but even with fender trimming
I still had a little rub on the trails. I wanted more clearance, and I
wanted to try a small suspension lift before I went with the Superlift
5.5 To this date, I have liked the lift a lot. It gave me the extra clearance
I wanted and I can now run 33s, maybe 34s. Most of all it got rid of
the soft stock suspension the explorer has and now when off-road I feel
like I have a lot more control, though I do want to install a steering
stabilizer. As you can see from the pictures it gave me a nice amount of
lift, of course its not as drastic because I didnt increase tire size.
Be aware though that if you already have a body lift youll want to install
lift lips, which are not pictured.
These are the actual instructions that James
Duff includes with their lift kit, though it does not include the semi
helpful diagram of your suspension and where the parts go. My comments
will be in BOLD and the instructions will not be. Before you even bother
reading this, be aware that it isnt easy. It took me the better part of
two days with assistance and a garage with every power tool I could ever
need. The most difficult part of the lift is the 8 rivets that you have
to remove from throughout the suspension. They require an air hammer and/or
radial compact grinder(I think thats what it is called). There are two
in each radius arm bracket and four in the left axle pivot bracket.

|
The kit consists of:
4 Shocks,
2 Radius Arm Drop Brackets,
2 Axle Pivot Drop Brackets (left and right)
2 Coil Springs
2 Add a leafs
2 Extended Shackles
All the nuts and bolts needed
|
Front End:
1. Measure and record vehicle height from axle to frame, next to rubber
bump stop. Measure and record height at wheel opening, through center of
wheel, from ground to fender, both sides. If vehicle is lower on one side,
the round spring spacer shim should be installed with the lift to level
the low side. I think they include this step for the Rangers and Bronco
IIs
I didnt need it.
2. Jack up vehicle using floor jack under I-beam, place safety stands
under frame and remove wheels and tires.
3. On vehicles with a front mounted sway bar, disconnect bottom end
of sway bar lower links with 18mm wrench and push them up out of the way.
4. To keep from damaging the brake lines, disconnect caliper from mounting
bracket and tie caliper out of the way.
5. Using floor jack under I-beam, raise to remove load from shock and
remove shock. Next, note how the spring is seated so you can position the
new one correctly. Lower jack to remove weight on coil spring and disconnect
the large(1 1/8) nut and washer that hold the lower portion of the coil
to the axle and remove the spring.
6. If needed, insert spring spacer shim over the lower bolt on the low
side of the vehicle(as shown in the diagram). Install the new coil, being
sure to seat it exactly as the original coil in the top of the spring tower.
Place the urethane spring seats over the top of the lower bolt and replace
the lower nut and washer, making sure the coil is centered on the centering
cup, then reattach the caliper to the mounting bracket.
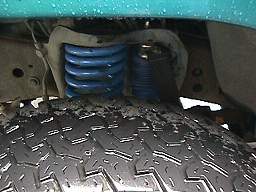
7. Repeat steps 4,5, and 6 for the other side. This is all pretty easy,
though I installed all the drop brackets before installing the springs.
They are easy to get in once the axle has been lowered. Youll also notice
I have limiting straps.
8. To remove the right axle pivot bracket, located under the battery,
place the floor jack under the center of the left I-beam. Raise jack until
contact is made and remove the right axle pivot bolt. Lower jack carefully
until the bracket and I-beam are approximately 4 apart. You may have to
pry to separate the I-beam and drop bracket. Unbolt the factory bracket
and bolt the new drop pivot bracket into position using the original bolts.
On some models, you will have to drill a ½ hole through the frame
rail before you can finish bolting on the new bracket. In this case it
helps to drill a ¼ pilot hole first using the bracket as a guide.
Use the ½ x 1 ½ gr 5 bolt and nut in this position. Re-align
the I-beam with the new drop pivot bracket and reconnect the original axle
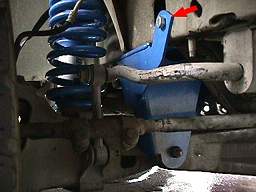
pivot bolt. I actually installed the radius arm brackets first. Having
the radius arms free to move around while I was trying to install the axle
pivots saved me a lot of time. For my 92 I did have to drill the hole
they talk about, which I highlighted with a red arrow.
9. To remove the left axle pivot bracket, located on back of engine
crossmember, reposition floor jack under right I-beam. Unbolt left axle
pivot bolt and pry the I-beam down away from the drop bracket. Grind away
the heads of the rivets holding the drop bracket to the crossmember and
drive out the shanks. Bolt the new cast iron drop bracket in place through
the rivet holes using the black ½ x 1 ¾ bolts. Re-align
I-beam with drop bracket and reconnect with original axle pivot bolt. A
line-up pin or center punch may help to accomplish this. This part isnt
fun, it has four rivets all of which we had to grind and mustve an hour
or so. The picture is up close, and if you want to see more the picture
of the left radius arm drop bracket shows it again.
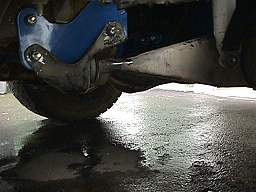
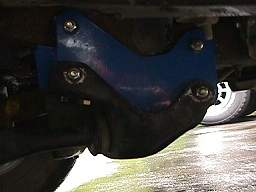
10. Remove the radius arm bushing retaining nuts from both sides. Loosen
the bolts that tie the radius arm mounting brackets together at the center.
Then torch or chisel off the rivets on the radius arm mounting brackets,
and lower them together. To install #6103 bushing, just remove the mounting
brackets from the radius arms, install front bushings and reinstall mounting
brackets. Place the new powder coated radius arm drop brackets between
the frame and the radius arm mounting brackets. Secure in place with the
7/16 and ½ bolts and nyloc nuts. Reinstall the radius arm bushing
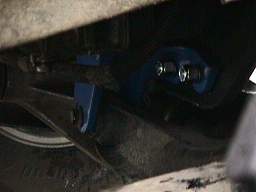
retaining nuts and torque to specification. Again the rivets arent easy,
I used an air hammer, and it took one hour per side. The first picture
is of the passenger bracket, the second is of the driver. Also, watch James
Duffs Web site, last time I talked to a salesperson and he mentioned they
are working on longer radius arms in place of the drop bracket, and theyre
also working on improved steering( longer pitman arm). Superlift offers
them too, so if you want 4 and up go with them.
11. Replace the shocks and reattach calipers to caliper mounting brackets.
Recheck brake lines after installation, as they may need adjustment to
keep from rubbing the wheels or coils. Reconnect the lower sway bar links,
if necessary.
12. Reinstall wheels and tires while watching carefully the position
of the brake lines. Adjust the as necessary to clear the coils and the
wheels and tires. Remove the floor jack and check again. Complete the rear
of the vehicle, then set toe-in.
Rear End:
1. Raise the rear of the vehicle and place on frame jacks, allowing
the axle to hang free. Leave the jack under the housing to prevent over
stressing the brake lines.
2. Remove the wheels and tires. Remove the stock shocks and U-bolts.
Lower the axle housing assembly away from the spring pack one side at a
time. If installing add-a-leafs, clamp the leaves that are longer than
the new add add-a-leaf together, then remove the center bolt. Install the
leaf in order of length and install the new center bolt in the spring pack.
The rear isnt to bad, but I do recommend removing a trailer hitch if you
have one, and the spare tire. It helps you to have more room to move everything
around and it give you a good time to paint that nasty trailer hitch and
was that mud covered spare. This is a picture of the shackles. (Insert
Picture # 9).
3. Install the new U-bolts and tighten them alternately to 70-80 ft.lbs.
4. Replace the shocks, and reinstall the wheels and tires. Remove jack
and lower vehicle.
James Duff includes instructions on steering alignment, but you should
have it done professionally, which means someone who actually has aligned
an explorer and/or lifted vehicle before. You may need new camber bushings
after the lift, I needed one.
Setting Toe-In: This is necessary for safe driving and to avoid front
end damage.
1. Using a floor jack, and with the front wheels barely off the ground,
set a light colored can of spray paint on the floor in front of one of
the tires. Spin the tire and depress the button of the spray can, spraying
a strip on the tire all around the circumference. Then do the other tie.
2. Take a board with a nail hammered through it, set it on the ground
to the nail can scribe a line through the paint as you spin the tire. Do
both tires.
3. Lower the front end to the ground, and with the help of a friend
measure the distance from one scribe line across to the other tire, on
both the front and the rear of the front tires.
4. The front measurement should be 1/8 less than the rear measurement.
That is proper toe-in.
5. To adjust the toe-in loosed the sleeve on the end of the tie rod
and drag link near the wheel with a 15mm wrench. Then turn the sleeve with
channel lock or water pump pliers. Adjust the sleeve the same number of
turns. Re-check until you reach the 1/8 difference. Then tighten the sleeves
back up with the 15mm wrench.
6. Drive directly to the alignment shop and have the caster, camber
and toe-in checked and aligned as necessary. Total lift is no achieved
until after alignment is done.
NOTE: After 50 miles and 100 miles of driving and after the first week,
all nuts and bolts should be checked. Any vibration of the driveline should
not be ignored, but thoroughly checked out.
EXPLORER HOME | MORE
EXPLORERS
|


